
The Complete SEO Checklist for ranking your website

by merodomain
For ranking in google is hard but it possible. so for ranking in google we make couple of seo checklist for ranking your website so you can try those techniques.
1. Setup Gmail Account
For ranking in google you have to use lot of google products so is better create one gmail account in your business name or service related name.
To create an account:
- Go to www.gmail.com.
- Click Create account.

- The sign-up form will appear. Follow the directions by entering the required information.

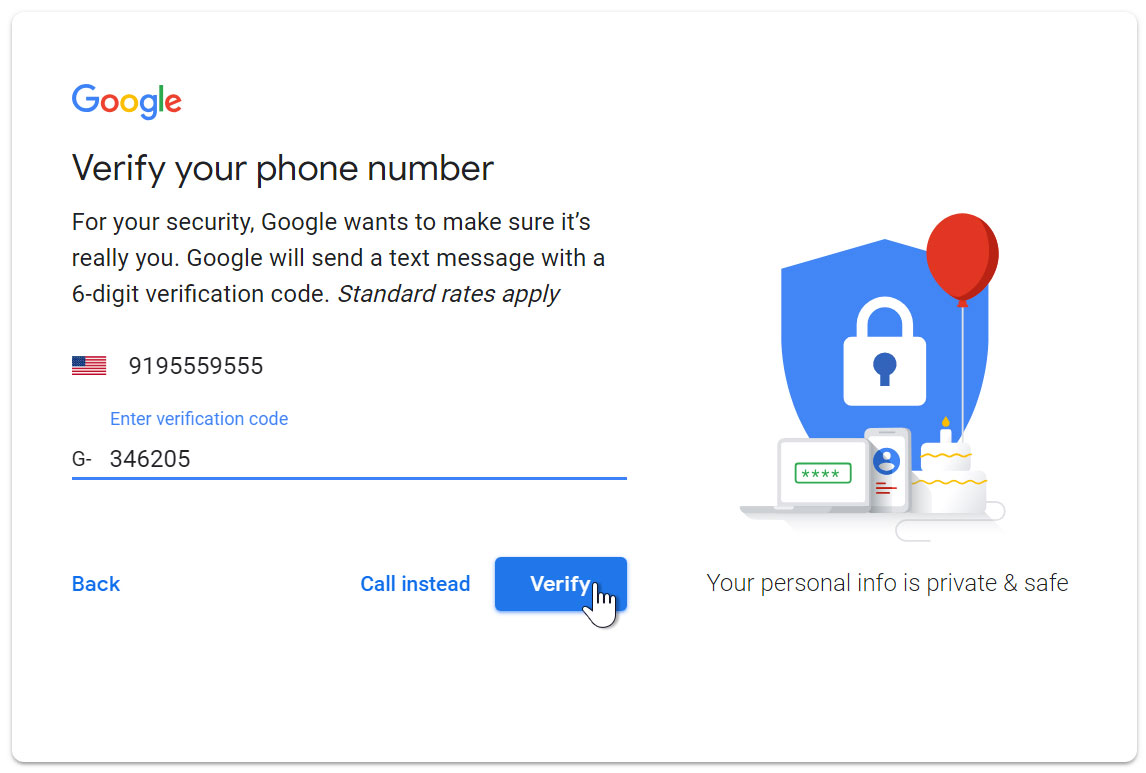
- Next, enter your phone number to verify your account. Google uses a two-step verification process for your security.

- You will receive a text message from Google with a verification code. Enter the code to complete the account verification.
- Next, you will see a form to enter some of your personal information, like your name and birthday.

- Review Google’s Terms of Service and Privacy Policy, then click I agree.

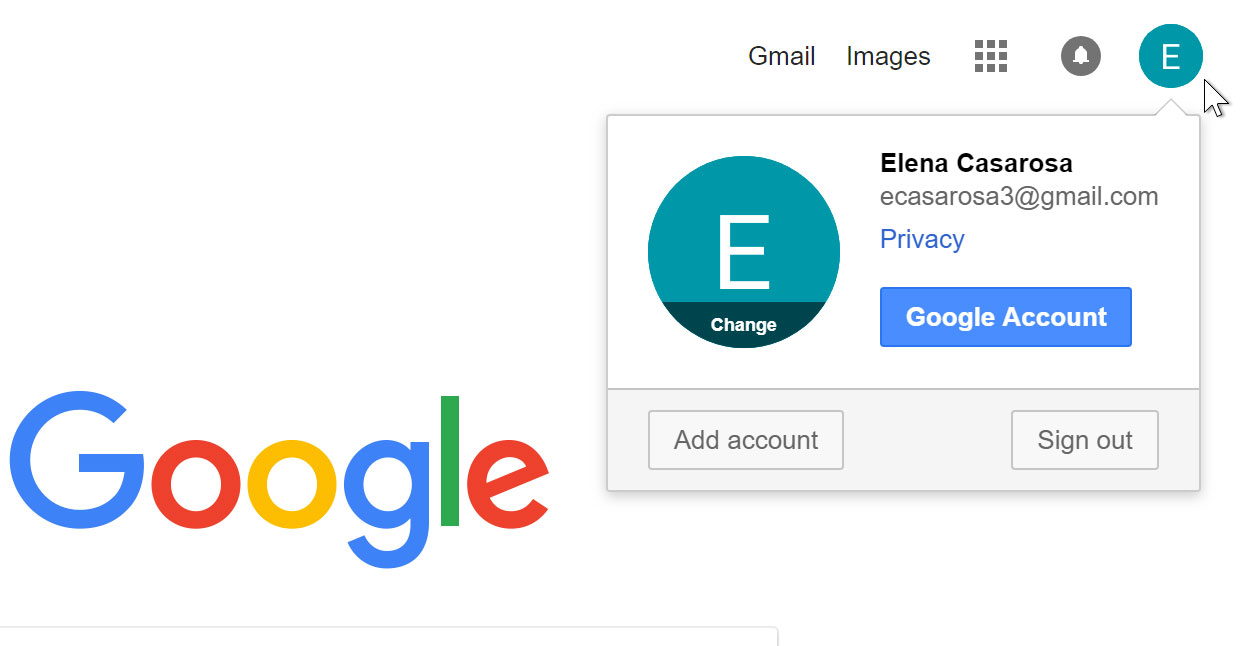
- Your account will be created.
Just like with any online service, it’s important to choose a strong password—in other words, one that is difficult for someone else to guess. For more information, review our lesson on creating strong passwords.
2. Setup The Google Search Console
Ideally, get set up on Google Analytics first, then adding Google Search Console is very easy.
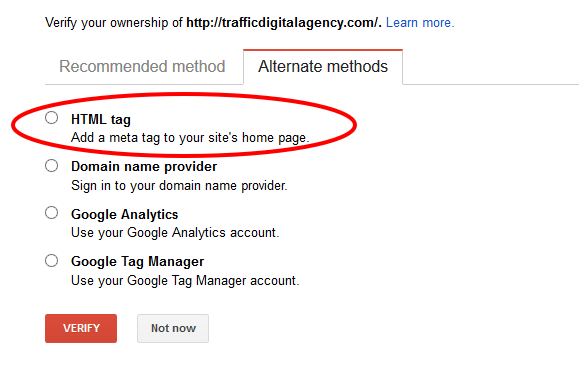
Adding an HTML tag
This verification method is best for users and site owners who have experience working with HTML code.

From the Search Console dashboard, select “Manage Property,” then “Verify this property.” If the “HTML Tag” option does not appear under “Recommended method,” then you should click on the “Alternate methods” tab and select “HTML tag.” This will provide you with the HTML code you’ll need for verification.
Copy the code and use your HTML editor to open the code for your site’s homepage. Paste the code provided within in the <Head> section of the HTML code. If your site already has a meta tag or other code in the <Head> section, it doesn’t matter where the verification code is placed in relation to the other code; it simply needs to be in the <Head> section. If your site doesn’t have a <Head> section, you can create one for the sake of verifying the site.
Once the verification code has been added, save and publish the updated code, and open your site’s homepage. From there, view the site’s source code. The verification code should be visible in the <Head> section.
Once you’re sure the code is added to your site’s homepage, go back to Search Console and click “Verify.” Google will then check your site’s code for the verification code. If the code is found, you will see a screen letting you know the site has been verified. If not, you will be provided with information about the errors it encountered.
When your site has been verified by Search Console, do not remove the verification code from your site. If the code is removed, it will cause your site to become unverified.
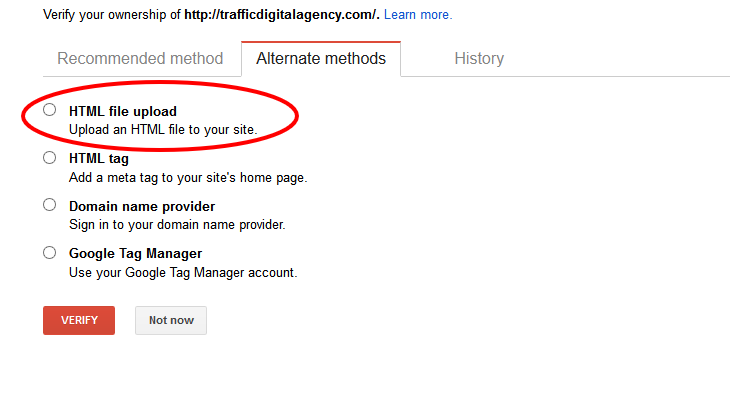
Uploading an HTML file
To use this method, you must be able to upload files to a site’s root directory.
From the Search Console dashboard, select “Manage site,” then “Verify this site.” If “HTML file upload” is not listed under “Recommended method,” it should be listed under the “Alternate method” tab.
When you select this method, you will be asked to download an HTML file. Download it, then upload it to the specified location. Do not make any changes to the content of the file or the filename; the file needs to be kept exactly the same. If it is changed, Search Console will not be able to verify the site.
After the HTML file has been uploaded, go back to Search Console and click “Verify.” If everything has been uploaded correctly, you will see a page letting you know the site has been verified.
Once you have verified your site using this method, do not delete the HTML file from your site. This will cause your site to become unverified.
Verifying via domain name provider
The domain name provider is the company you purchased a domain from or where your website is hosted. When you verify using your domain name provider, it not only proves you’re the owner of the main domain, but that you also own all of the subdomains and subdirectories associated with it. This is an excellent option if you have a large website.
From the Search Console dashboard, select “Manage site,” then “Verify this site.” If you don’t see the “Domain name provider” option listed under “Recommended method,” look under the “Alternate method” tab.
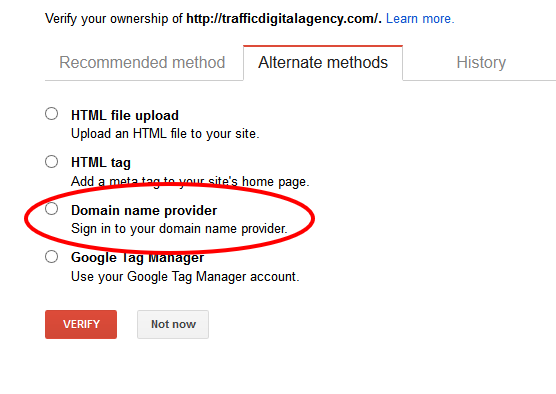
When you select “Domain name provider,” you will be asked to choose your domain name provider from a list of commonly used providers, such as GoDaddy.com. If your provider is not on this list, choose “Other” and you will be given instructions on how to create a DNS TXT record for your provider. If a DNS TXT record doesn’t work for your provider, you will have the option of creating a CNAME record instead.
Adding Google Analytics code
If you already use Google Analytics (GA) to monitor your site’s traffic, this could be the easiest option for you. But first, you’ll need to be able to check the site’s HTML code to make sure the GA tracking code is placed within the <Head> section of your homepage’s code, not in the <Body> section. If the GA code is not already in the <Head> section, you’ll need to move it there for this method to work.
From the Search Console dashboard, select “Manage site,” then “Verify this site.” If you don’t see the “Google Analytics tracking code” option under the “Recommended method,” look under the “Alternate method” tab. When you select “Google Analytics tracking method,” you’ll be provided with a series of instructions to follow.
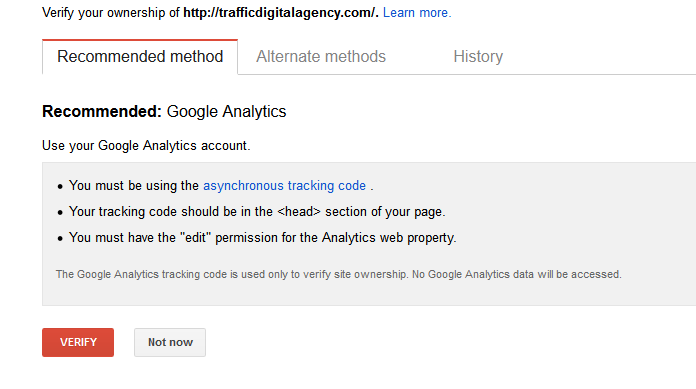
Once your site has been verified, do not remove the GA code from your site, or it will cause your site to become unverified.
Using Google Tag Manager
If you already use Google Tag Manager (GTM) for your site, this might be the easiest way to verify your site. If you’re going to try this method, you need to have “View, Edit, and Manage” permissions enabled for your account in GTM. Before trying this method, look at your site’s HTML code to make sure the GTM code is placed immediately after your site’s <Body> tag.
From the Search Console dashboard, select “Manage site,” then “Verify this site.” If you don’t see the “Google Tag Manager” option listed under “Recommended method,” it should appear under “Alternate method.”
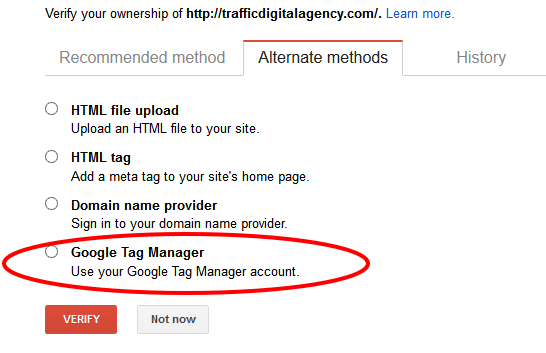
Select “Google Tag Manager” and click “Verify.” If the Google Tag Manager code is found, you should see a screen letting you know your site has been verified.
Once your site is verified, do not remove the GTM code from your site, or your site will become unverified.
Adding a sitemap
Sitemaps are files that give search engines and web crawlers important information about how your site is organized and the type of content available there. Sitemaps can include metadata, with details about your site such as information about images and video content, and how often your site is updated.
By submitting your sitemap to Google Search Console, you’re making Google’s job easier by ensuring they have the information they need to do their job more efficiently. Submitting a sitemap isn’t mandatory, though, and your site won’t be penalized if you don’t submit a sitemap. But there’s certainly no harm in submitting one, especially if your site is very new and not many other sites are linking to it, if you have a very large website, or if your site has many pages that aren’t thoroughly linked together.
Before you can submit a sitemap to Search Console, your site needs to be added and verified in Search Console. If you haven’t already done so, go ahead and do that now.
From your Search Console dashboard, select the site you want to submit a sitemap for. On the left, you’ll see an option called “Crawl.” Under “Crawl,” there will be an option marked “Sitemaps.”
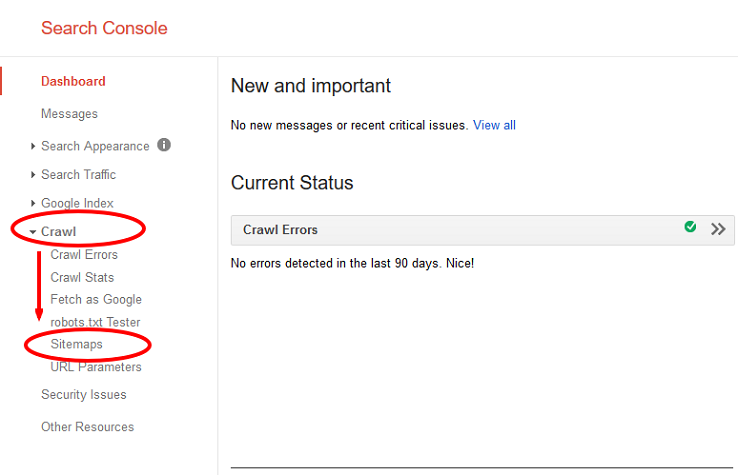
Click on “Sitemaps.” There will be a button marked “Add/Test Sitemap” in the upper righthand corner.
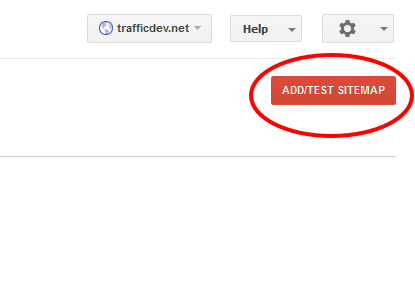
This will bring up a box with a space to add text to it.
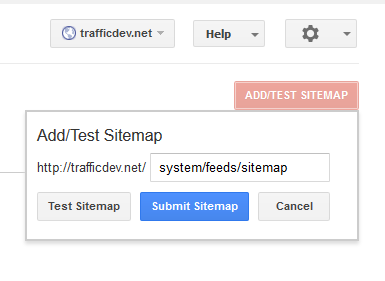
Type “system/feeds/sitemap” in that box and hit “Submit sitemap.” Congratulations, you have now submitted a sitemap!
Checking a robots.txt file
Having a website doesn’t necessarily mean you want to have all of its pages or directories indexed by search engines. If there are certain things on your site you’d like to keep out of search engines, you can accomplish this by using a robots.txt file. A robots.txt file placed in the root of your site tells search engine robots (i.e., web crawlers) what you do and do not want indexed by using commands known as the robots Exclusion Standard.
It’s important to note that robots.txt files aren’t necessarily guaranteed to be 100% effective in keeping things away from web crawlers. The commands in robots.txt files are instructions, and although the crawlers used by credible search engines like Google will accept them, it’s entirely possible that a less reputable crawler will not. It’s also entirely possible for different web crawlers to interpret commands differently. Robots.txt files also will not stop other websites from linking to your content, even if you don’t want it indexed.
If you want to check your robots.txt file to see exactly what it is and isn’t allowing, log into Search Console and select the site whose robots.txt file you want to check. Haven’t already added or verified your site in Search Console? Do that first.
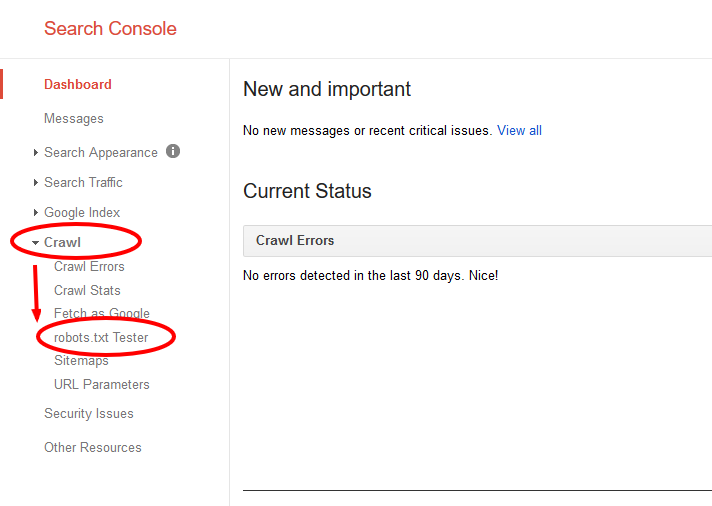
On the lefthand side of the screen, you’ll see the option “Crawl.” Click on it and choose “robots.txt Tester.” The Robots.txt Tester Tool will let you look at your robots.txt file, make changes to it, and it alert you about any errors it finds. You can also choose from a selection of Google’s user-agents (names for robots/crawlers) and enter a URL you wish to allow/disallow, and run a test to see if the URL is recognized by that crawler.
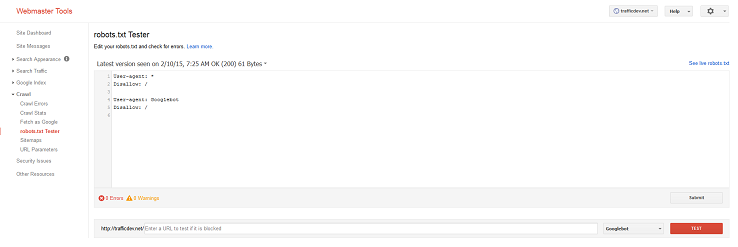
If you make any changes to your robots.txt file using Google’s robots.txt tester, the changes will not be automatically reflected in the robots.txt file hosted on your site. Luckily, it’s pretty easy to update it yourself. Once your robots.txt file is how you want it, hit the “Submit” button underneath the editing box in the lower righthand corner. This will give you the option to download your updated robots.txt file. Simply upload that to your site in the same directory where your old one was (www.example.com/robots.txt). Obviously, the domain name will change, but your robots.txt file should always be named “robots.txt” and the file needs to be saved in the root of your domain, not www.example.com/somecategory/robots.txt.
Back on the robots.txt testing tool, hit “Verify live version” to make sure the correct file is on your site. Everything correct? Good! Click “Submit live version” to let Google know you’ve updated your robots.txt file and they should crawl it. If not, re-upload the new robots.txt file to your site and try again.
Fetch as Google and submit to index
If you’ve made significant changes to a website, the fastest way to get the updates indexed by Google is to submit it manually. This will allow any changes done to things such as on-page content or title tags to appear in search results as soon as possible.
The first step is to sign into Google Search Console. Next, select the page you need to submit. If the website does not use the ‘www.’ prefix, then make sure you click on the entry without it (or vice versa.)
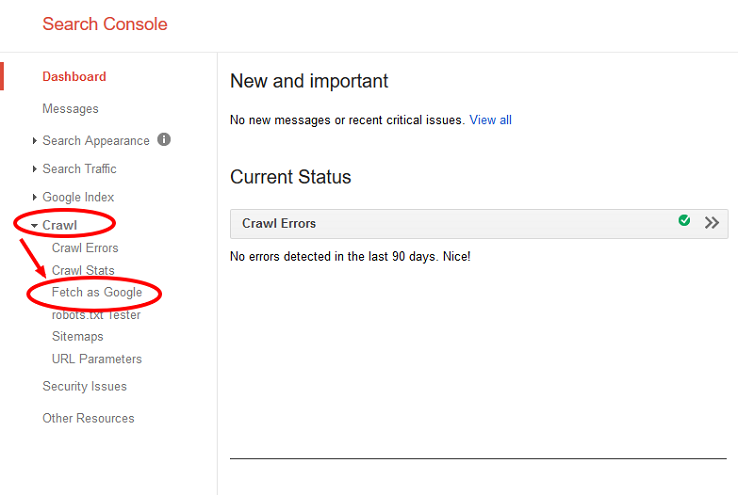
On the lefthand side of the screen, you should see a “Crawl” option. Click on it, then choose “Fetch as Google.”
Clicking on “Fetch as Google” should bring you to a screen that looks something like this:
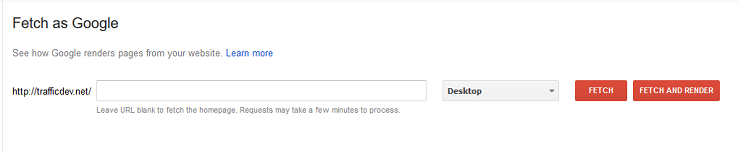
If you need to fetch the entire website (such as after a major site-wide update, or if the homepage has had a lot of remodeling done) then leave the center box blank. Otherwise, use it to enter the full address of the page you need indexed, such as http://example.com/category. Once you enter the page you need indexed, click the “Fetch and Render” button. Fetching might take a few minutes, depending on the number/size of pages being fetched.
After the indexing has finished, there will be a “Submit to Index” button that appears in the results listing at the bottom (near the “Complete” status). You will be given the option to either “Crawl Only This URL,” which is the option you want if you’re only fetching/submitting one specific page, or “Crawl This URL and its Direct Links,” if you need to index the entire site.
Click this, wait for the indexing to complete, and you’re done! Google now has sent its search bots to catalog the new content on your page, and the changes should appear in Google within the next few days.
Site errors in Google Search Console
Nobody wants to have something wrong on their website, but sometimes you might not realize there’s a problem unless someone tells you. Instead of waiting for someone to tell you about a problem, Google Search Console can immediately notify you of any errors it finds on on your site.
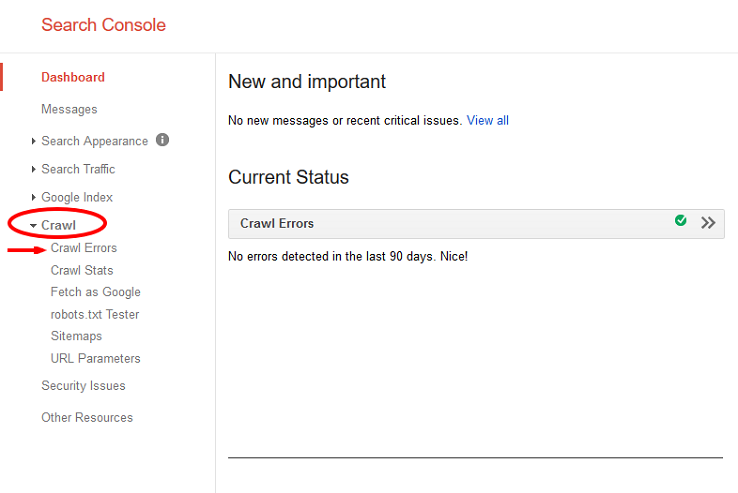
If you want to check a site for internal errors, select the site you’d like to check. On the lefthand side of the screen, click on “Crawl,” then select “Crawl Errors.”
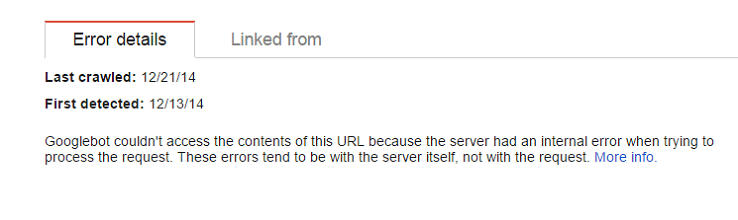
You will then be taken directly to the Crawl Errors page, which displays any site or URL errors found by Google’s bots while indexing the page. You will see something like this:
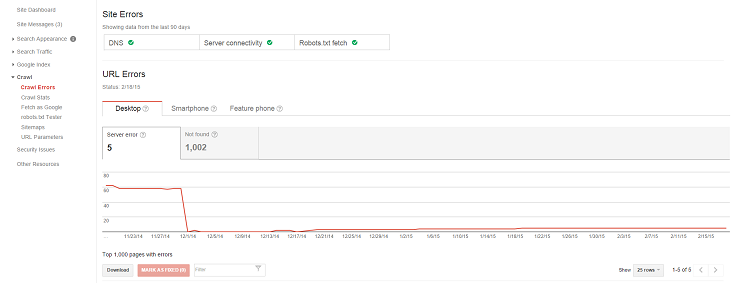
Any URL errors found will be displayed at the bottom. Click on any of the errors for a description of the error encountered and further details.
Record any encountered errors, including screenshots if appropriate. If you aren’t responsible for handling site errors, notify the person who is so they can correct the problem(s).
3. Setup Google Analytics
Why you need Google Analytics
Google Analytics is a robust and powerful tool that provides indispensable information about your website and visitors.
With more than 56 percent of all websites using Google Analytics, it’s also one of the most popular tools out there for digital marketers — and for good reason. The tool allows you to access a wealth of information regarding your site’s visitors.
Here’s just a few pieces of data you can get from Google Analytics:
- Amount of traffic your site gets overall
- The websites your traffic came from
- Individual page traffic
- Amount of leads converted
- The websites your leads came form
- Demographic information of visitors (e.g. where they live)
- Whether your traffic comes from mobile or desktop
It doesn’t matter if you’re a freelancer with a humble blog or if you’re a big company with a massive website and social media presence. Anyone can benefit from the information in Google Analytics.
Now that you know how great it is, let’s jump into exactly how to set up Google Analytics for your own website.
Step 1: Set up Google Tag Manager
Google Tag Manager is a free tag management system from Google.
The way it works is simple: Google Tag Manager takes all the data on your website and sends it to other platforms such as Facebook Analytics and Google Analytics.
It also allows you to easily update and add tags to your Google Analytics code without having to manually write code on the back end—saving you time and a lot of headaches down the road.
Let’s say you want to be able to track how many people clicked on a downloadable PDF link. Without Google Tag Manager, you’d have to go in and manually change all the download links to do this. However, if you have Google Tag Manager, you can just add a new tag to your Tag Manager to track the downloads.
First, you’ll have to create an account on the Google Tag Manager dashboard.
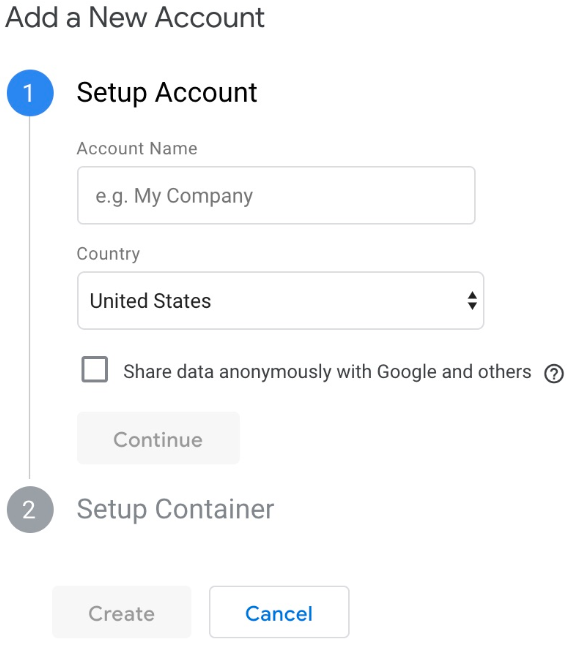
Enter in an account name and click continue.
You’ll then set up a container, which is essentially a bucket containing all of the “macros, rules, and tags” for your website, according to Google.
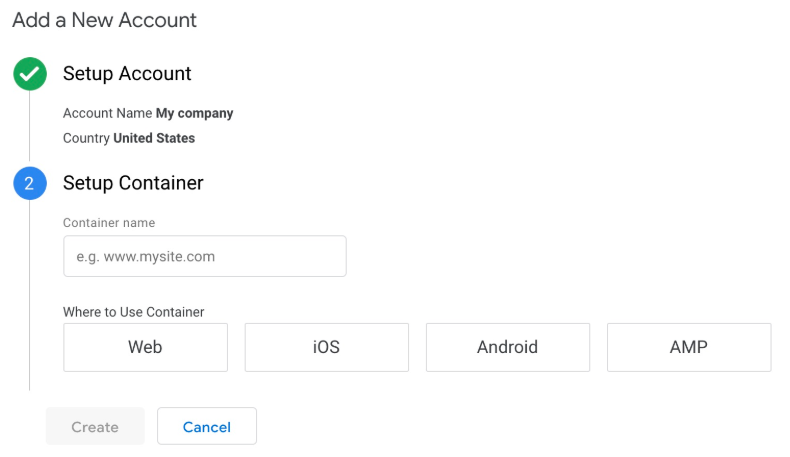
Give your container a descriptive name and select the type of content it’ll be associated with (Web, iOS, Android, or AMP).
Once that’s done, click create, review the Terms of Service, and agree to those terms. You’ll then be given the container’s installation code snippet.
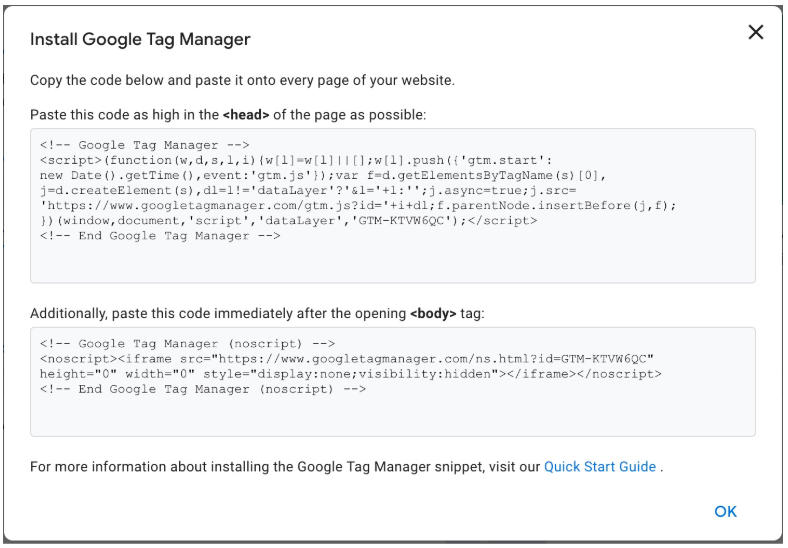
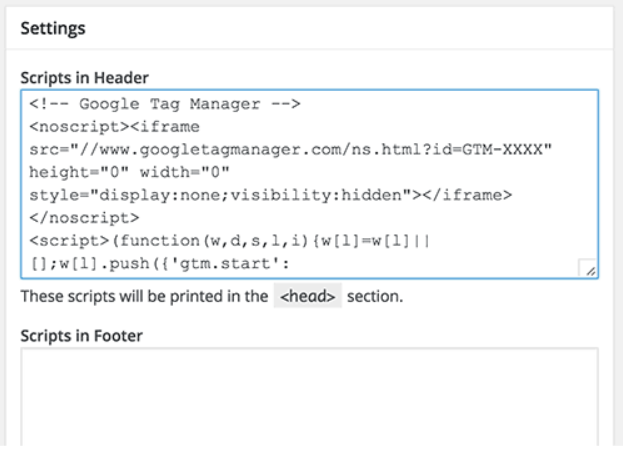
This is the piece of code you’ll be pasting into your website’s back end in order to manage your tags. To do that, copy and paste the two snippets of code onto every page of your website. As the instructions say, you’ll need to the first one in the header and the second after the opening of the body.
If you’re using WordPress, you can easily do this by pasting the two pieces of code into your WordPress theme.
Pro tip: You can make this process even easier by installing and activating the Insert Headers and Footers plugin for WordPress (or equivalent for other types of websites). This will allow you to add any script to the Header and Footer throughout your entire website, but you only have to copy and paste it once.
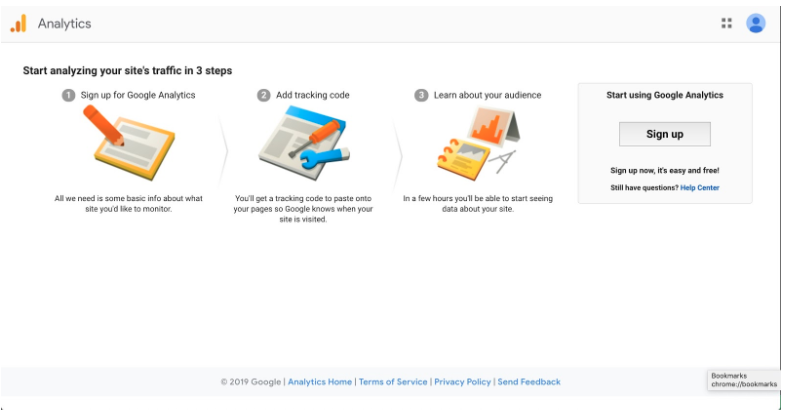
Step 2: Create a Google Analytics account
Like Google Tag Manager, you’re going to want to create a Google Analytics account by signing up on the GA page.
Enter your account and website name, as well as the website’s URL. Be sure to also select your website’s industry category and the time zone you want the reporting to be in.
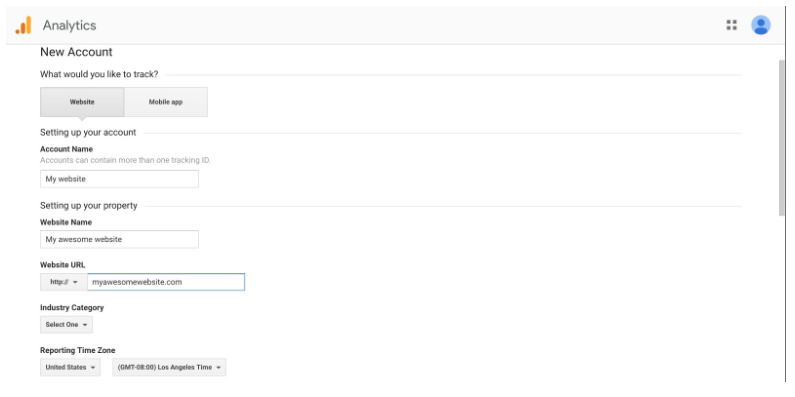
Once you do all that, accept the Terms and Services in order to get your tracking ID.
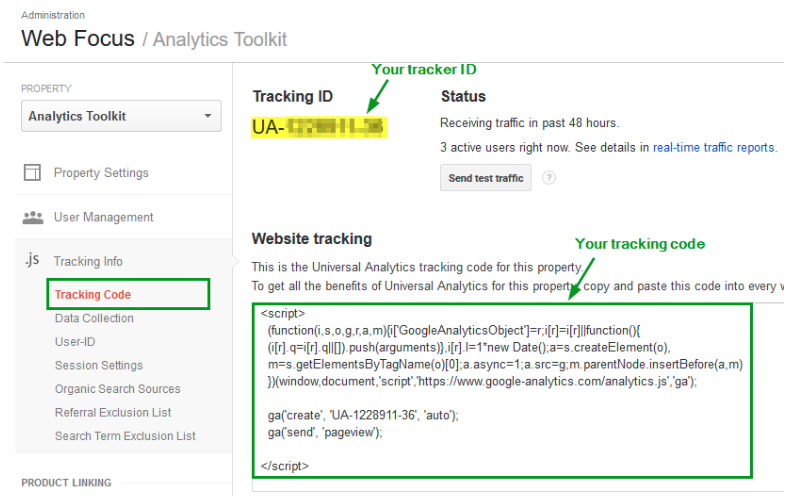
The tracking ID is a string of numbers that tells Google Analytics to send analytics data to you. It’s a number that looks like UA-000000-1. The first set of numbers (000000) is your personal account number and the second set (1) is the property number associated with your account.
This is unique to your website and your personal data—so don’t share the tracking ID with anyone publicly.
Once you have the tracking ID, it’s time to move onto the next step.
Step 3: Set up analytics tag with Google Tag manager
Now you’ll learn how to set up specific Google Analytics tracking tags for your website.
Go to your Google Tag Manager dashboard and click on the Add a new tag button.
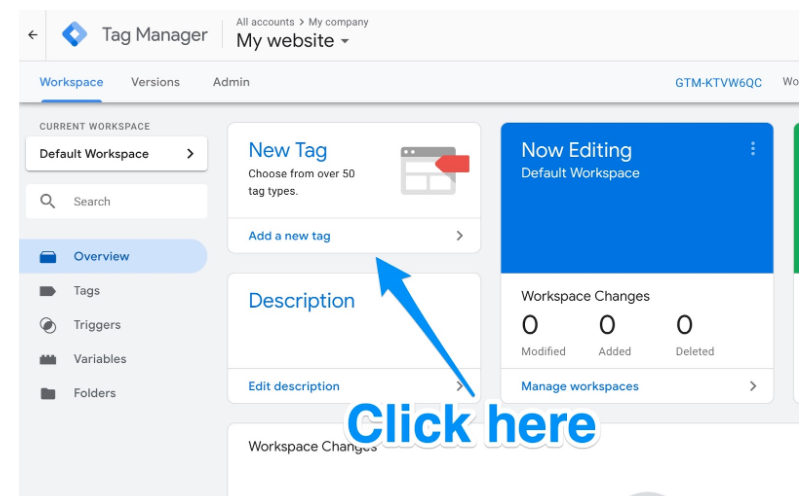
You will be taken to a page where you can create your new website tag.
On it, you’ll see that you can customize two areas of your tag:
- Configuration. Where the data collected by the tag will go.
- Triggering. What type of data you want to collect.
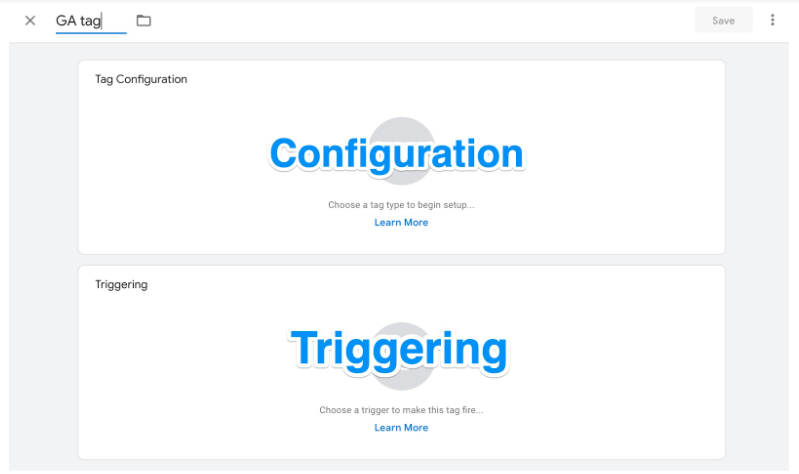
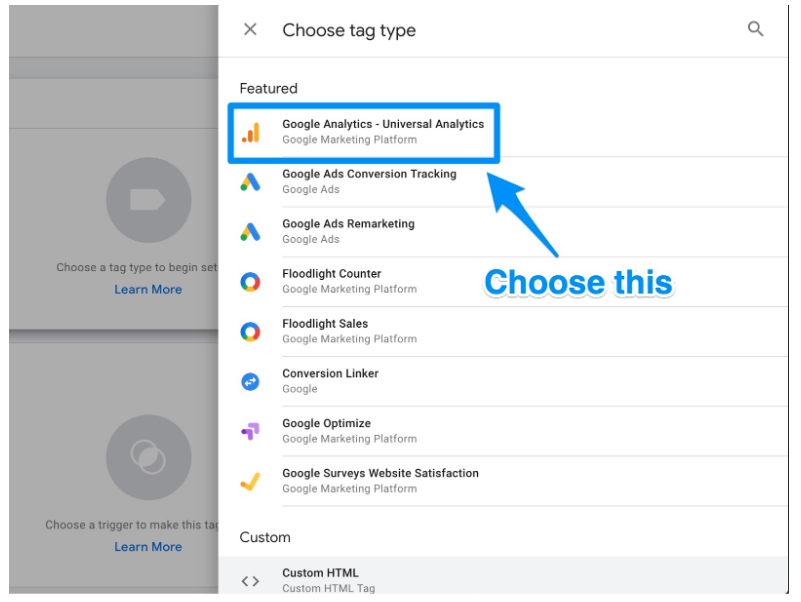
Click on the Tag Configuration button to choose the type of tag you want to create.
You’ll want to choose the “Universal Analytics” option in order to create a tag for Google Analytics.
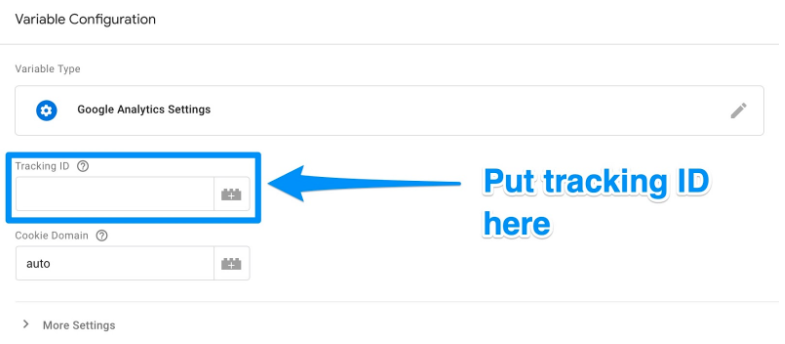
Now you can choose the type of data you want to track. Do that and then go to “Google Analytics Setting” and choose New Variable… from the dropdown menu.
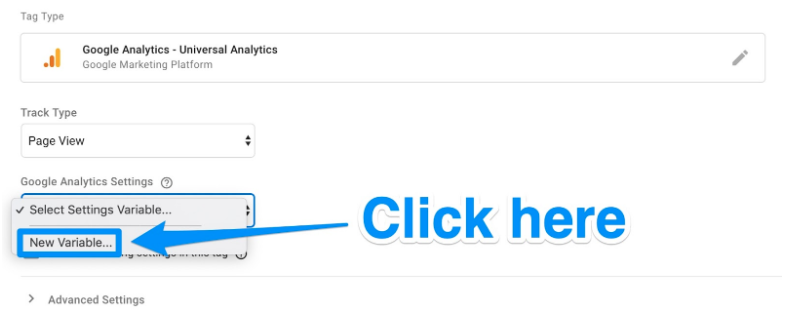
You’ll then be taken to a new window where you’ll be able to enter in your Google Analytics tracking ID. This will send your website’s data straight into Google Analytics where you’ll be able to see it later.
Once this is done, head to the “Triggering” section in order to select that data you want to send to Google Analytics.
As with the “Configuration,” click on the Triggering button in order to be sent to the “Choose a trigger” page. From here, click on All pages so it sends data from all your web pages.

When all is said and done, your new tag set up should look something like this:
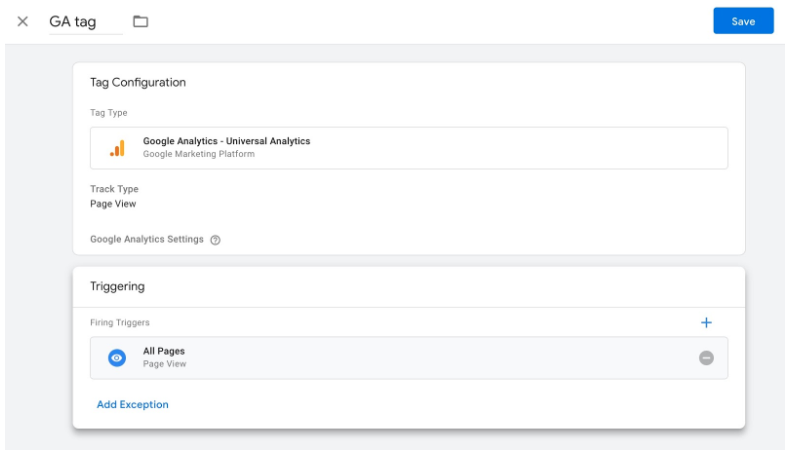
Now simply click Save and voila! You have a new Google Tag tracking and sending data to your Google Analytics page about your website!
We’re not done yet, though. You still need to set up your goals — which brings us to…
Step 4: Set up Google Analytics goals
While you probably know the key performance indicators for your website and business, Google Analytics doesn’t.
Bonus: Get a free social media analytics report template that shows you the most important metrics to track for each network.
That’s why you need to tell Google what success looks like for your website.
In order to do that, you need to set goals on your Google Analytics dashboard.
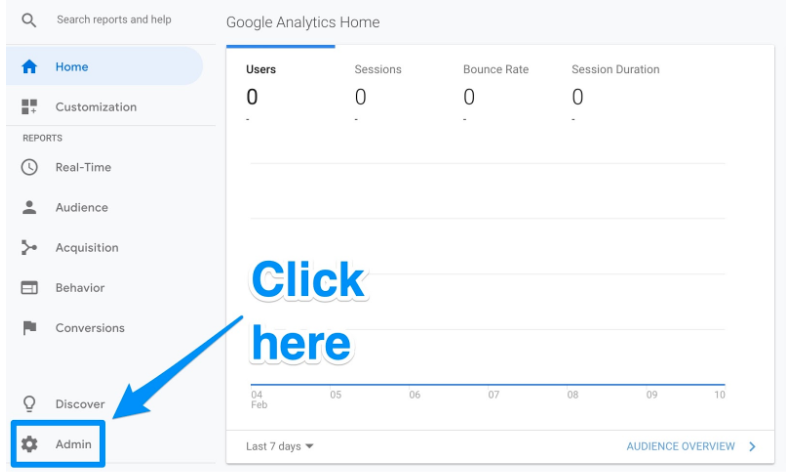
Start by clicking on the Admin button on the bottom left corner.
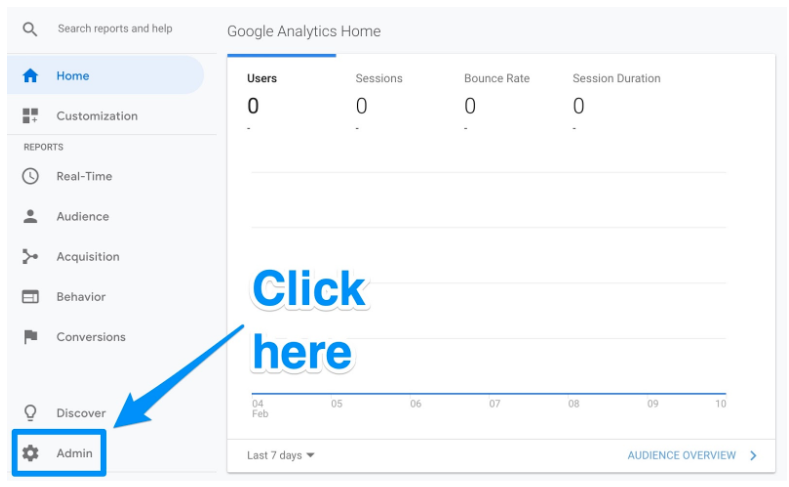
Once you do, you’ll be sent to another window where you’ll be able to find the Goals button.
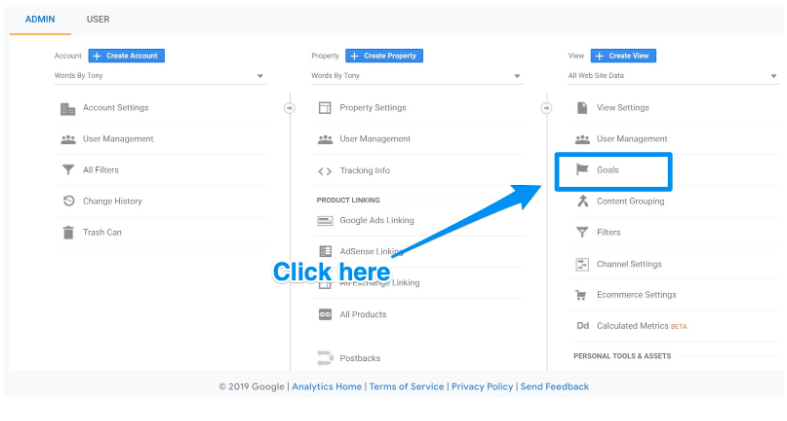
Click on that button and you’ll then be taken to the “Goals” dashboard where you’ll be able to create a new goal.
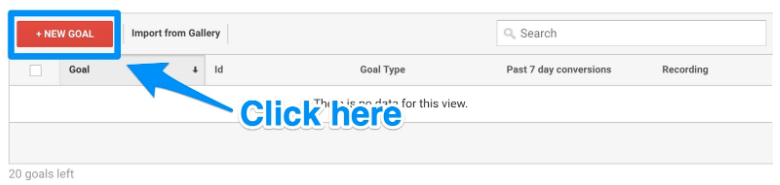
From here, you’ll be able to look through different goal templates to see if one matches your intended goal. You’ll also need to choose the type of goal you want. They include:
- Destination. e.g. if your goal was for your user to reach a specific web page.
- Duration. e.g. if your goal was for users to spend a specific amount of time on you site.
- Pages/Screens per session. e.g. if your goal was to have users go to a specific amount of pages.
- Event. e.g. if your goal was to get users to play a video or click on a link.
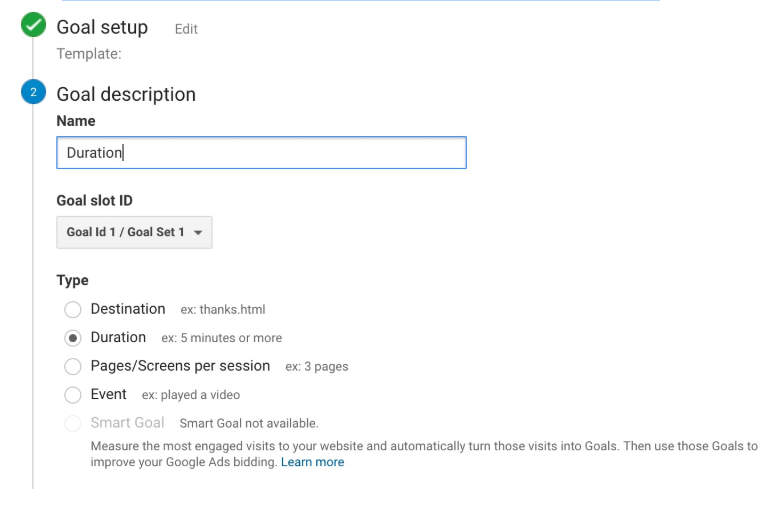
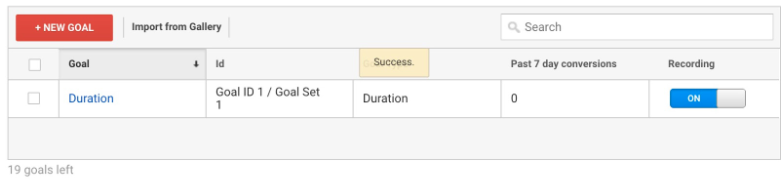
From there, you can get even more specific with your goals like choosing exactly how long users need to spend on your site in order to consider it a success.
Once you’re done, save the goal and Google Analytics will start to track it for you.
Remember: There is a wide variety of data you can track using both Google Tag Manager and Google Analytics. It’s easy to get lost in all the metrics you can track. Our recommendation is to start small with the metrics that matter most to you.
Step 5: Link to Google Search Console
Google Search Console is a powerful tool to help marketers and webmasters gain invaluable search metrics and data.
With it, you can do things like:
- Check your site’s search crawl rate
- See when Google analyzes your website
- Find out what internal and external pages link to your website
- Look at the keyword queries you rank for in search engine results
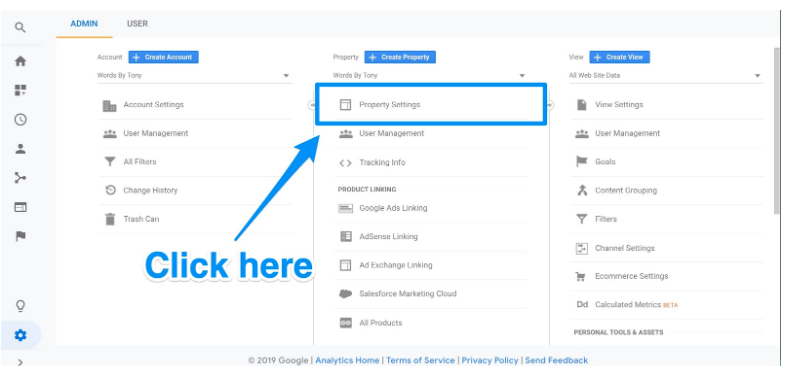
To set it up, click on the gear icon in the lower left hand corner of the main dashboard.
Then click on Property Settings in the middle column.
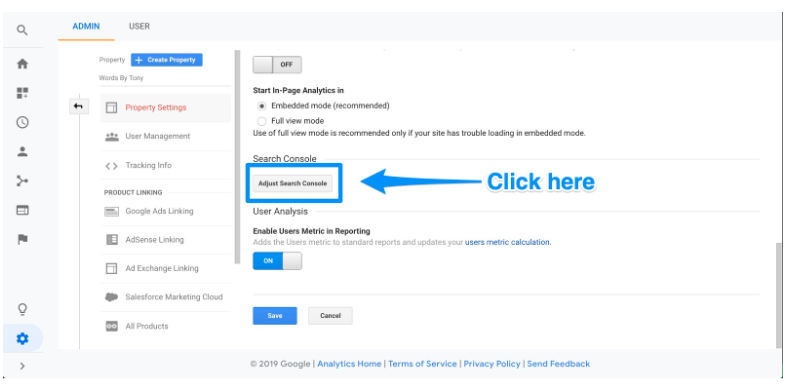
Scroll down and click on Adjust search console.
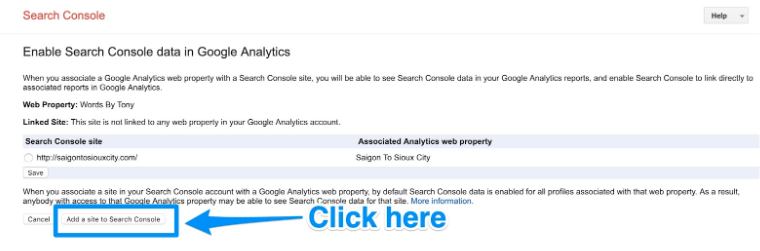
Here you’ll be able to start the process of adding your website to Google Search Console.

Click on the Add button and you’ll be redirected to this page. At the bottom, click on the Add a site to Search Console button.
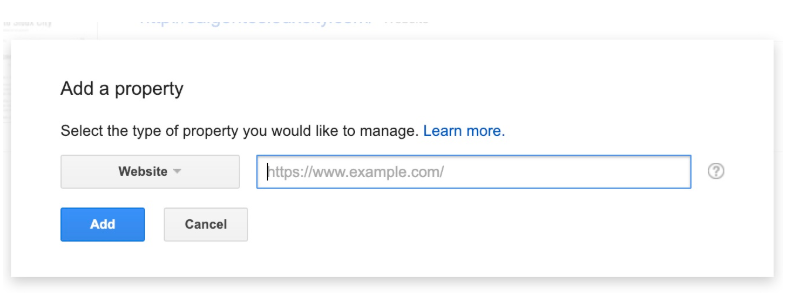
From here, you’ll be able to add a new website to Google Search Console. Enter in your website’s name and click Add.
Follow the directions to add the HTML code to your site. Once you’re done with that, click on Save and you should be taken back to Google Analytics.
Your data won’t appear right away—so be sure to check back later to see your Google Search Console data.
What next?
Now, there are a ton of different things you can do with Google Analytics. The world of data analysis and web marketing is literally at your fingertips.
Here are a few suggestions of things you can do:
Grant access to your team
If you’re working with a team, grant permissions to make sure other people can access the data on Google Analytics.
To add users, you simply have to follow these six steps from Google:
- Click on the gear icon in the lower left hand corner to go to the Admin dashboard
- In the first column, click on the User Management button
- Click Add new users
- Enter the email address for the user’s Google account
- Select the permissions you want to grant them
- Click Add
And voila! You should now be able to give others access to your business’s Google Analytics data.
Link Google Ads with Google Analytics
If your business uses Google Ads, you can now link that to your Google Analytics account so you can see “the full customer cycle, from how they interact with your marketer (eg seeing ad impressions, clicking ads) to how they finally complete the goals you’ve set for them on your site (eg making purchases, consuming content),” according to Google.
To link the two accounts, follow the nine steps below:
- Click on the gear icon in the lower left hand corner to go to the Admin dashboard
- In the “Property” column, click on Google Ads Linking
- Click on New Link Group
- Click on the Google Ads accounts you want to link with Google Analytics
- Click Continue
- Make sure that linking is on for each property you want to see data from Google Ads
- Click Link accounts
With your accounts linked, you’ll have even greater access to information you need to determine your ad campaign’s ROI.
Set up views
Google Analytics allows you to set up your reports so you only see the data and metrics that matter to you through “views.”
By default, Google Analytics gives you an unfiltered view of each website in your account. That means if you have, say, three websites associated with you Google Analytics, it’ll all be sent to one property where the data is aggregated.
However, you can set it up so you only get the data you want to see. For example, you could have a view that helps you see only organic search traffic. Or maybe you want to see only social media traffic. Or you want to see conversions from you target market.
All can be done through views.
To add a new view, simply follow the steps below:
- Click on the gear in the lower left hand corner to go to the Admin dashboard
- In the “View” column, click Create new view
- Select “Web Site” or “App”
- Enter a name for the view describing what it’s filtering for
- Choose the “Reporting Time Zone”
- Click Create View
Once you create your view, you’ll be able to edit the view settings to filter exactly what you want to see.
4. Keyword Research Checklist
Keyword Research is the foundation of SEO. So it’s important to do keyword research the right way. And in this checklist I’ll show you how to quickly find keywords that your customers search for.
1. Discover Long Tail Keywords With “Google Suggest”
This is one of the best ways to uncover long tail keywords.
Here’s how it works:
First, type a keyword into Google.

But don’t press enter…or the “Google Search” button. Instead, check out the keywords that Google shows you:

(These are known as “Google Suggest” keywords)
Because these keywords come straight from Google, you KNOW that people are searching for them.
Which means that they’re great keywords to optimize your site around.
Pro Tip: Check out Keywordtool.io. This tool scrapes Google Suggest keywords, which makes this process much easier to scale.

2. Find Solid Keywords In The Google Keyword Planner
The Google Keyword Planner is Google’s official keyword research tool.

It’s technically designed for Google Adwords. That said, it’s still VERY useful for SEO keyword research.
After all, the data comes straight from Google. So you know that it’s super accurate.
4. Identify Low Competition Keywords With KWFinder
KWFinder is a freemium keyword research tool.
What makes KWFinder unique is that it gives you TONS of data on each keyword.

As you can see, when you type a keyword into KWFinder, you get information on:
- Search volume
- Keyword difficulty
- CPC
- Trends
- Estimated visits
That way, you can choose low-competition keywords that are easy to rank for.
5. Find “Question Keywords” With ATP
Question Keywords are PERFECT for blog posts and articles.
(For example: “How do you make cold brew coffee?”)
But how do you find them?
This free tool shows you questions that people search for online.

That way, you can answer these questions with your content.
On-Page SEO Checklist
Now it’s time to optimize your content using a handful of tested on-page SEO techniques.
1. Include Your Keyword In Your URL
Your URL helps Google understand what your page is all about. And a keyword-rich URL can improve your organic CTR.

That’s why you want to include your keyword in your URL.
For example, my target keyword for this page is “SEO checklist”.
So I made the URL for this page: https://backlinko.com/seo-checklist.
Simple.
2. Use Short URLs
Keep your URLs as short as possible.
Why?
A recent analysis of 1 million Google search results found that short URLs rank best in Google.

3. Front-Load Your Keyword In Your Title Tag
It’s no secret that you should use your keyword in your title tag.
But not as many people know that WHERE you put your keyword matters.
Specifically, you want to put your keyword in the front of your title tag.
4. Embed Title Tag Modifiers
Title Tag Modifiers are words and phrases to add to your title tag.
When you do, your page will rank for lots of long tail keywords.
5. Use Your Keyword Once In The First 150 Words
Google puts more weight on the first 100-150 words of your page.
So make sure to use your keyword once here.
For example, for my SEO tools post, you can see that I use the term “SEO Tools” right off the bat:

6. Use Your Keyword in H1, H2 or H3 Tags
Make sure to include your keyword in H1, H2 or H3 tags.
7. Optimize Images
The images you use say a lot about your content.
Unfortunately, Google is really bad at reading images.
So to help them understand your images, you want to optimize your image alt tags and filenames.
spinach_omelette.png
Then, when you add the image to your page, give it a descriptive alt tag.
I like to use lots of alt text so Google can fully understand what my image is:

That’s all there is to it.
8. Use Synonyms and LSI Keywords
Back in the day, it made sense to “keyword stuff” your page.
Not anymore.
Today, Google is smart.
So instead of using the same keyword 1000 times, use synonyms and LSI keywords.
For example, let’s say you want to rank for “how to start a blog”.
Well, you’d want to mention that exact keyword a few times on your page… and synonyms like:
- How to launch a blog
- Starting a blog
- How to create a blog
- How to setup a blog on WordPress
You get the idea 🙂
Next, add some LSI Keywords.
LSI Keywords are terms that go along with your main keyword.
You can find a bunch of these using LSIGraph.com.

Then, just add a few of these LSI keywords to your page. And you’re set.
9. Use External Links
Make sure to link out to 5-8 authority sites in your article.
For example, in this list of SEO techniques, I link to trusted websites like Wikipedia and Google.com.

And those links show Google that my content is well-referenced and trustworthy.
10. Use Internal Links
This is super simple:
Whenever you publish a new piece of content, link to 2-5 other pages on your site.
Pro Tip: Use keyword-rich anchor text in your internal links.
For example, note how I use the anchor text “on-page SEO”, in this internal link:

This tells search engines that the page I’m linking to is about: “on-page SEO”.
Technical SEO Checklist
Technical SEO can make or break your rankings. Fortunately, fixing technical SEO problems isn’t that hard… especially if you follow the items on this checklist.
1. Identify Crawl Errors
A “Crawl Error” means that Google has trouble viewing a page on your site.
And if they can’t view your page, it’s not gonna rank for anything.
You can easily find Crawl Errors in the Google Search Console’s “Coverage” report:

If you notice Google is having trouble accessing one of your important web pages (for example, robots.txt is blocking search engine spiders), you’ll want to get that fixed ASAP.
2. Find Out How Google Views Your Page
Sometimes users can see everything on your page…
…but Google can’t.
Again:
If Google can’t fully access your page, it won’t rank.
That’s why I recommend using the Google Search Console’s “Inspect URL” feature.
Just enter a page from your site at the top of the GSC.

When you do, you’ll see your page from Google’s point of view:

Very helpful.
3. Make Sure Your Site is Mobile-Friendly
Google recently launched a new “Mobile-First Index“.
Which means:
If your site isn’t mobile optimized, it’s not going to rank very well.
Fortunately, you can easily see your site’s mobile friendliness with Google’s Mobile-Friendly Test.
Just pop in a page from your site… and get a clear “yes or no” answer.

Pretty cool.
4. Fix Broken Links
Broken links can REALLY hurt your SEO.
5. Secure Your Site With HTTPS
HTTPS is a confirmed Google ranking signal.

So if you haven’t already, it’s time to move your site to HTTPS.
(Or if you just launched a new site, set it up with HTTPS on day 1)
Here’s a guide to help you migrate your site to HTTPS… without hurting your SEO.
6. Check Your Site’s Loading Speed
Does your site load insanely fast?
If not, your site isn’t going to rank as well.
That’s why you want to head over to PageSpeed Insights.
This free tool lets you know how quickly your site loads for desktop and mobile users:

It even lets you know what you can do to speed things up.

Content Checklist
There’s no denying it: if you want to rank in Google, you need to publish great content. That’s why content is now a BIG part of any modern-day SEO strategy. And in this section I’ll show you the exact steps to creating the type of content that ranks in 2020 (and beyond).
1. Create Amazing Content Using “The Skyscraper Technique”
The Skyscraper Technique is a powerful formula for publishing amazing content.
In fact, I used this technique to double my search engine traffic:

Here’s the 3-step process:
- First, identify a piece of popular content in your industry
- Next, create something even better
- Finally, promote that content
Obviously, I don’t have room to go into more detail on these steps here.
2. Chunk Your Content to Maximize Readability
No one likes reading giant walls of text:

That’s why I ALWAYS break my content into easy-to-read chunks, like this:

These chunks keep my bounce rate low, which is a key Google ranking factor.
(More on that later)
3. Cover Your Page’s Topic In-Depth
When we analyzed over a million Google Search Results, one thing stood out:
Content that ranks best in Google tends to cover an entire topic in-depth.

(Not to mention the fact that Google has said that they use page speed as a ranking signal).
So yes, site speed IS important for SEO.
Here’s exactly how Proven sped things up:
First, they ran their site through Google’s PageSpeed Insights tool:

Then they tested their site’s loading speed with GTMetrix.com.
Why did did they use both?
Google’s tool only looks at your page’s HTML.
GTMetrix actually loads your page.
(That way you can see if server issues are slowing things down)
Overall, Sean’s site loaded pretty quickly.
The only problem was that his images weren’t well optimized.

Once he optimized his images (by manually resizing them and specifying image dimensions in his HTML), Sean’s loading speed significantly improved:

Recommended Posts
Local Delivery Platforms Setup Services
April 23, 2021


5 Reasons Every Local Restaurant Needs A Website
December 18, 2020
 0
0